Holiday Crafts

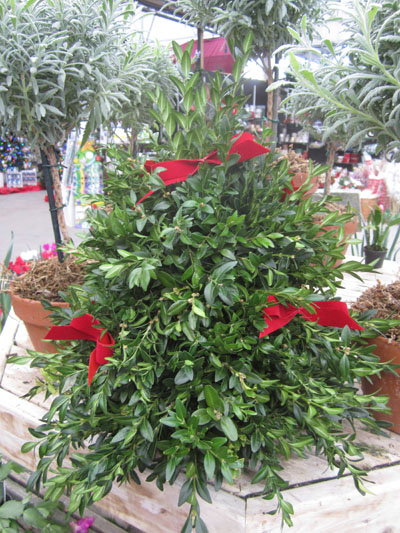
Make a boxwood tree
Please watch Erin put together a Boxwood Tree in this Video!
Here’s a tip-sheet the with Boxwood Tree supplies list and step-by-step instructions, too.
 Supplies
- Oasis foam- 1 ‘brick’
- Florist tape
- Shallow bowl to hold Oasis
- 2 Sleeves of Boxwood (or balsam greens)-available by mid-November
- 8ft. of ribbon, ¼” wide for bows. Cut into 12” lengths
- 8ft. of wire or 8 Wired Picks for bows. Cut in 12” lengths
- Gloves
- Pruners
- Decorative elements if desired: Small Red Bows on picks, Pinecones on picks and/or Sprays of Berries (pulled apart or if natural, carefully trimmed into 3, 5 or 7 pieces)
Steps to Make a Boxwood Tree
- Trim off 4 corners of one end of the Oasis Block.
- Submerge your Oasis in water until thoroughly soaked.
- Position Oasis Block in bowl with trimmed corners at the top. Secure Oasis in bowl by taping from the bowl edge up over the top and down the side to the opposite bowl edge. Do the same on the opposite side.
- PREPARE YOUR BOXWOOD GREENS: Pull one branch of boxwood. Start at the tip and prune a spray of leaf stems about 9-10” long. Keep this for your tall center. Move around the branch and cut pieces 6-8” long. Strip leaves off about 1-2” from insertion tip of piece to make it easier to insert. (If stem seems too thick, you can slice at a lengthwise angle to make a sharp point that will be easier to insert.) The whole branch should be usable.
- Sort your greens into similar lengths, 8-9 pieces of each. Longer ones will help form your pyramid shape and shorter ones can be used to fill in.
- START by inserting your longer boxwood piece at top center of the Oasis to be your peak.
- INSERT BOTTOM GREENS as pairs, on opposite faces near the base and then on the Oasis block edges. These greens determine how wide your tree will be. Inserting pieces as opposites will help you maintain a symmetrical form.
- Take paired pieces that are somewhat shorter than your bottom pieces and insert opposite each other about half way up each side face of the Oasis block and also half way up the block edges.
- Insert shorter pieces at top 4 corners of block. By now, you’ll see the overall shape of the tree forming.
- FILL IN by inserting pairs oppositely along the side edges of the Oasis block and opposite sides of the faces until full.
- MAKE THE SMALL BOWS. For each small bow, use 12” of ribbon, 1 wired pick or 12″ florist wire. Pre-cut your pieces. Make a loop with your ribbon and overlap the ends to form an X. Pinch the loop in the middle and keep the ‘right side’ out and right side of tails facing up. Wrap the bow with a loop of wire in the center and twist to tighten. If using a pick, wrap excess wire to the pick. If just wire, fold the excess wire in half and twist to form a stiffer wire suitable for inserting into the Oasis.
- Once all the greenery has covered the Oasis, insert small bows spaced evenly around the “tree.”
- Insert your other decorative elements: small colorful balls, pine cones, sprays of berries, and/or mistletoe wherever you wish!
Caring for your Boxwood Tree
- Keep in a cool location indoors.
- Check Oasis after 4-5 days and add water to bowl if Oasis is dry.
- Boxwood tree should stay fresh for 1-2 months.

MAKE A KISSING BALL
Another fun activity with friends so please enjoy with others within your healthy circle!
Please watch Claire put a Kissing Ball together in this video. Then, download this printable instruction sheet.
If you have questions or need more demonstration, our floral staff at the craft desk are happy to help!
Supplies – all available from Ward’s
- Oasis foam- 1/2 of a ‘brick’
- 4.5 yds of Ribbon, ¼ to ½” wide. (1.5 yds for “top”, 3 yds for “tail”)
- Wired Pick for inserting “tail”
- Pruners
- Gloves
- Hook for hanging ball in your work space
- 2 Sleeves of Boxwood (or balsam greens)-available by mid-November
- Decorative elements if desired: Small Red Bows on picks, Pinecones on picks and/or Sprays of Berries (pulled apart or if natural, carefully trimmed into 3, 5 or 7 pieces)
- For small bows, use additional 16″ of ribbon for each bow (8 bows = 3 yds 18 in. ribbon) and a Wired Pick for each or 12 in. florist wire (8 bows=2 yds 2 ft. of wire).
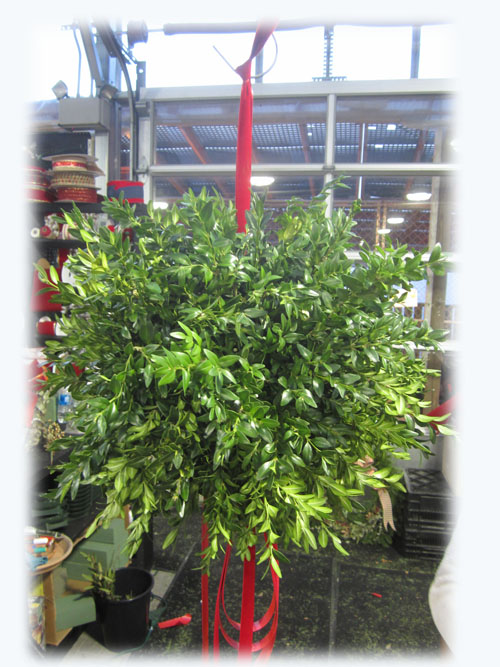
Steps to Make a Kissing Ball
- 1. Submerge your oasis in water until thoroughly soaked.
- MAKE THE TOP LOOP. Wrap oasis with 1.5 yards “top” ribbon like a package; knot tightly at top of oasis and knot ends together to form a loop for hanging.
- Hang ribbon wrapped oasis block on a hook to allow for easy insertion.
- PREPARE YOUR BOXWOOD GREENS: Pull one branch of boxwood. Start at the tip and prune a spray of leaf stems about 6-8” long. Move around the branch and cut similar length pieces. Strip leaves off about 1-2” from insertion tip of piece to make it easier to insert. (If stem seems too thick, you can slice at a lengthwise angle to make a sharp point that will be easier to insert.) The whole branch should be usable.
- INSERT GREENS as pairs, one opposite the other as you go.
- Start by inserting boxwood pieces around center knot on top of the oasis and then opposite around the bottom center.
- Insert paired pieces opposite each other in the centers of each side face of the oasis block.
- Insert pieces at 4 corners of block. By now, you’ll see the overall shape of the ball forming.
- FILL IN by inserting pairs oppositely along the side edges of the oasis block and opposite sides of the faces until full.
- FORM THE TAIL. Take the remaining 3 yards of ribbon. Form 2 smaller loops and 1 longer loop that will extend below the greenery and form the “tail”. Wrap the top center of the loops tightly with wire from your Wired Pick. Loop the extra wire around the Pick to keep secure. Cut one longer loop to make 4 ends that flutter in a breeze. Insert Pick into bottom center of Oasis.
- DECORATE TO TASTE. Once all the greenery has covered the oasis, insert your decorative elements: small bows, pine cones, sprays of berries, and/or mistletoe wherever you wish!
Caring for your Kissing Ball
- Hang along porch eaves or in a cool location indoors.
- Boxwood or Balsam Kissing Balls should stay fresh for 1 month.

Kissing Balls with or without Bows
Our Summer Garden Advice
By mid-summer, perennial gardens can start to look overgrown, annual flowers begin to fade, and bugs may be munching on your vegetables.
Summer Articles